Getting the Most from your HD Video Camera
Wayne Norton
Digital Imaging Consultant Video Engineer – HDCinematics
Using a DSC Chart
The great thing about the new Pro HD cameras is their ability to totally adjust the color matrix. Using the DSC color chip chart, tape measure, two equal light sources and Adobe OnLocation, Adobe Premiere Pro or Apple Final Cut Pro’s built-in waveform monitors and vectorscopes, we will calibrate our camera to get the most color space possible. Most serious HD cameras have color matrix adjustments (check the user manual for your camera).
Adobe OnLocation is an excellent calibration tool – for use on initial camera matrix calibration as well as for on-set exposure control and monitoring. It is available in CS3, CS4 and CS5 versions. As these are important concepts I will go into some details of both camera matrix adjustment and on-set calibration and monitoring. We’ll start with the waveform monitor and the white side of our DSC color chart. First we need to setup our calibration conditions as accurately as possible to get the most reliable results.
For calibration, I find it is best to move the chart to approximately 6 feet from the camera – straight on. Make sure to secure both the camera (locked down on tripod) and the chart so they do not move. I use a tape measure to place 2 identical diffuse lights at an equal distance from the chart, with the aim of illuminating the face of the chart evenly. If you see a lot of glare coming off of the chart into the camera, try tilting the chart slightly forward or backward to eliminate it – the DSC CamStand chart holder is designed for this. Be sure to have the chart fully in frame before beginning calibration by using the charts handy framing registration markers. Zoom (or move your tripod) until the charts framing reference lines, line up with the edges of your viewfinder. After setting up the lights, turn the chart over to the white side (on custom two sided “white card” ChromaDuMondes – if not use the neutral gray background on the front of the chart instead). Your waveform monitor is a great way to gauge your lighting – it should show an almost straight line across the screen when your lighting is even and you have your exposure set properly (the gray bars on the front of the chart will help us set our exposure correctly a little later). If the lines on the waveform monitor appear to dip on one side, what you are seeing is where the lighting is uneven- if there is a droop in the line on the left side of the screen, move the light on the left a little closer and retest – same story on the right side. The waveform monitor represents the light values it “sees” rather than painting a picture that your eyes readily recognize, each color represented by a number position on the waveform grid. This function will help us set our white and black values – an important step in obtaining proper exposure and grabbing all of the light from your scene. Adjust the line produced by the white chart until it just touches the 100 line – now you have set your maximum white point to 100% – where it belongs – (see Example 1). (Note: Use the white chips on the front of the chart to set 100% white if you have a standard ChromaDuMonde – without the white card on the rear).
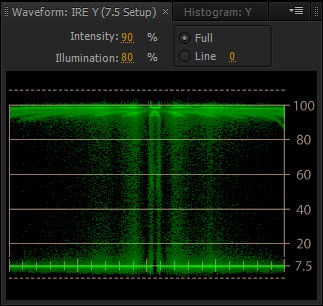
Example 1
Waveform monitor showing well-balanced lighting
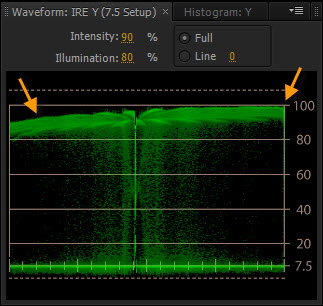
Example 2
What you don’t want to see!
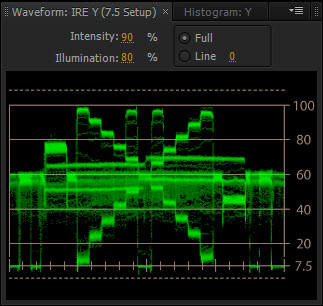
Example 3
Color side of DSC chart showing range of colors
Example 2 – what you don’t want to see! Uneven lighting makes the line appear to dip on the left side.
Once you have your lights setup, before going any further it is necessary to white-balance to your lights (your camera manual will have information on how to white balance – and it should be done at any lighting change). Now it’s time to turn the chart around to the color side. Your waveform monitor should now show a pattern similar to the image on the right. Pay close attention to the boxes at the top and bottom of the display – these are the white and black chips on the DSC chart and will guide us in setting up our exposure for the lighting and our bottom black level. The idea is to open the lens (adjust the f-stop or aperture setting) until the white boxes (the 4 boxes across the top of the waveform display) are just touching the 100 line. If after opening the lens all the way and ensuring your shutter is turned off* your white boxes still fall short of the 100 mark you need to add more light and re-adjust. After adjusting the white level check the waveform monitor for the 3 boxes at the bottom of the “X” (formed by the grayscale chips on the chart), and should be as close to the bottom line as possible. You should adjust your black level or master black level to bring the level to where it belongs. The closer these values are aligned on the waveform and vectorscope monitors, the better will be your color depth and saturation. You will notice a marked improvement in all of the footage you shoot – colors will pop out at you that were somewhat bland looking before and if you use the chart and the scopes before every setup you will always be assured of proper exposure and color control. Example 3 shows a properly exposed DSC chart – notice the white value at 100 and the black at 7.5 – now we have the full range of light in the scene available to record.
Once your master white and black levels are set, it’s time to move on to the vectorscope. Here is where we will adjust our color matrix – phase, balance and gain. The vectorscope is set up with 6 boxes as targets – one each for red, magenta, blue, cyan, green and yellow. At the middle of the scope is white. The pattern in the middle of the scope is how the camera sees the colors on the DSC chart (the output signal for each of those colors). the Looking closely, each line emanating from the center represents of the scope display represents one of the same basic colors as are represented by the vectorscope boxes. The closer the ends of those lines are to being inside their respective color boxes, the closer the camera is to being properly calibrated. Looking at Example 4 you see the vectorscope representation of the DSC chart before any adjustment (using the cameras out of the box presets). We want the center of our ‘star’ pattern pretty much in the center of the vectorscope display we are done, and the ends of each color line in each of their respective boxes. Looking at Example 4, the pattern is not too bad, but the star pattern is visibly off-center and the lines are not anywhere near to their color boxes. Now it is time to make adjustments. Refer to your camera manual and locate the color matrix (correction) adjustments and controls and become familiar with them, they are the key to any successful camera color calibration! These controls vary drastically from camera-to-camera so the best thing is to get setup with your chart and experiment with each setting while observing the resulting changes on your scope. You will see that almost any adjustment you make will have an effect on all of the other colors as well as the phase (rotation of the star pattern) of the colors. As you adjust for red, your green suffers, and vice-versa. With an appropriate amount of time, and the power of the vectorscope and chart, you should be able to get your colors better on target and much more vibrant with increased saturation. This will require some trial-and-error, but your target goal is clear and obtainable.
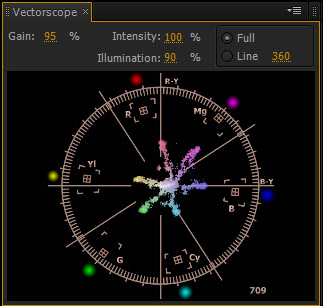
Example 4
Color side of DSC chart uncorrected matrix
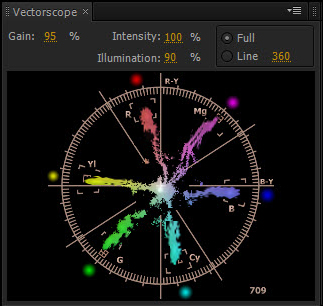
Example 5
DSC chart with corrected matrix
Example 5 shows the same setup after a quick tweaking – not quite perfect but much closer with a lot better color depth. There is a point of over-saturation so watch your output monitor in OnLocation for obvious signs of over-doing it. Your chart should look bright, color accurate and rich when your camera is properly calibrated. Your footage will look it’s absolute best and provide your post production staff with the easiest media to work with.
Why bother? Well, the new HD cameras are nice, but without spending tens of thousands of dollars, they are not quite as good as 35mm film cameras for resolution. If you want your output to look as good as film you will already start off handicapped by that fact. In order to get the best quality output you need the best quality input – that means recording as much of the real color space as possible. This is probably the only way to do so. After learning these techniques, my on set calibration and setup time is minimal, my results are predictable and reliable, colors are vibrant and look great – and the footage is easy to work with – the less color correction you require in post production the better! There are many more details to follow related to this subject in following chapters and articles. For now I hope I have given you enough info to get your camera shooting at its best.
* if you do not have a shutter ‘off’ setting set as follows – for 30fps use 1/60th second shutter speed – for 24fps use 1/48th second shutter speed. Otherwise keep the shutter off unless using for slow-motion or fast action sequences.